
Prerequisite Modules
This module explores the Button API which gives a user basic digital input into the embedded system.
Button API
While a button is simple mechanically, there are many considerations to using them correctly in an embedded system. Like the LED API, the button API abstracts the hardware details from the firmware so the quantity, polarity, port, and pin number of the buttons does not have to be known. The driver also provides debouncing and simple functions to provide typical button operations.
Signal Bouncing
Signal bouncing is the multiple make-and-break connections that occur in a mechanical switch before the signal is stable. The image below shows an oscilloscope capture of one of the development board buttons being released which clearly shows the intermediate signals that occur before the switch state stabilizes. Note the time scale is 50us per division, so if the first rising edge is when the button is first released, it’s 300us before the signal is stable.
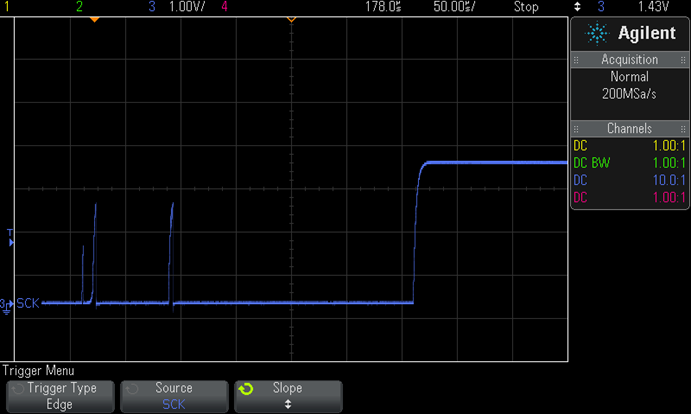
Managing contact bounce is especially important for interrupt-driven button sensing as literally every signal transition (rising or falling edge) will cause an interrupt. If firmware doesn’t handle it properly, some very strange behavior can occur.
For the input shown above, the processor would see at least three (but probably four) rising edge inputs even though all the edges occurred in just 300us. A debouncing algorithm starts when the processor sees the first signal edge then simply waits a period of time to look at the signal state again when it should be stable to decide if there was a legitimate state change. It is not a difficult piece of code to write, but if you just want to use the buttons and not worry about this sort of thing, it’s nice if the API does all the work.
Note that the reset button on the EiE development boards is not included in this driver as it is purely a hardware function on the processor’s reset line.
Type Definitions
There are no public button-specific types. However, the button names applicable to the target development board are required wherever a u32Button_ parameter is requested and are predefined below. BUTTON0 is on the left side of the development board.
ASCII development board: BUTTON0, BUTTON1, BUTTON2, BUTTON3
Dot matrix development board: BUTTON0, BUTTON1
Public Functions
The following functions may be used by any application in the system at any time.
- bool IsButtonPressed(u32 u32Button_) – Returns TRUE if a particular button is currently pressed (and debounced).
- bool WasButtonPressed(u32 u32Button_) – Returns TRUE if a particular button was pressed since last time it was checked even if it is no longer pressed. ButtonAcknowledge() is typically called immediately after WasButtonPressed() returns TRUE to clear the button pressed state.
- void ButtonAcknowledge(u32 u32Button_) – Clears the New Press state of a button — generally always called after WasButtonPressed() returns TRUE to clear the “New Press” state.
- bool IsButtonHeld(u32 u32Button_, u32 u32ButtonHeldTime_) – Returns TRUE if a button has been held for u32ButtonHeldTime_ time in milliseconds.
Only WasButtonPressed() needs to be used slightly carefully. When a button is pressed, the driver sets a flag (i.e. a bit in a memory location that the API interprets as indication a button press occurred). Even if the button is released, the flag will remain set until it is cleared in firmware. This is called “latching” the signal. Latching ensures the signal is not missed. WasButtonPressed() checks this flag but does not clear it so it can be used by multiple tasks. ButtonAcknowledge() clears the flag. In EiE, it would be rare to have more than one task checking the same button, but it’s possible. In the case, the programmer must be aware of the task order and any special rules about clearing the flag.
Checking a latched button signal is very different than simply checking if a button is pressed or held at a given instant as it ensures that a single button press can only result in a single event – a very important capability that requires quite a few lines of code to implement manually, so it was included in the API.
Examples
Start with a clean branch of the Master firmware. Add the following examples in user_app1.c. Remember to try to write the code before looking at the solution provided. The examples detailed here are for the dot matrix development board. Please follow the IAR version of this module if you are using the ASCII development board.
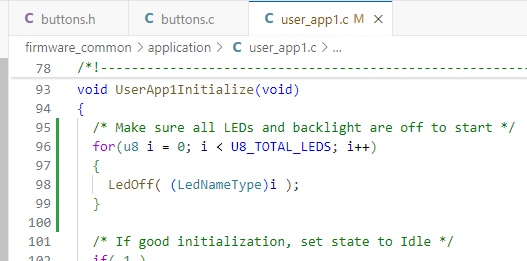
First, make sure all LEDs are properly initialized in UserApp1Initialize():
In UserApp1SM_Idle(), add code to turn on the BLUE0 LED if BUTTON0 is currently pressed. Think about how this should work since the Idle state runs every millisecond (hint: there’s no trick here).

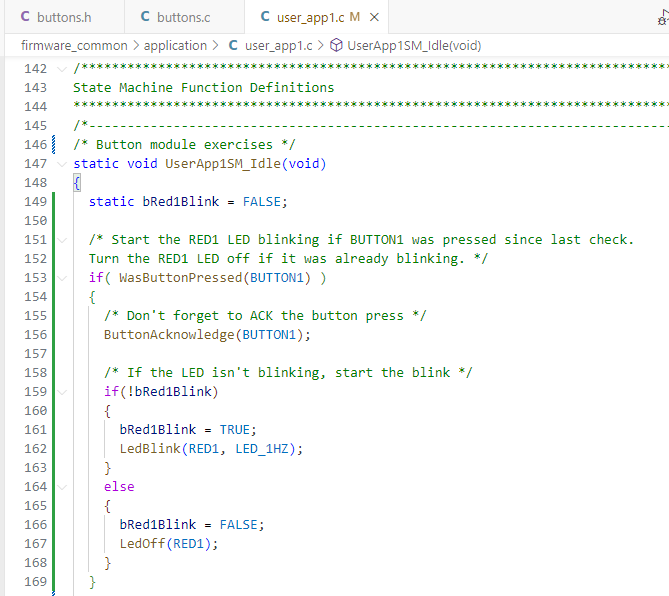
Toggle blinking on/off of the RED1 LED when BUTTON1 has been pressed. ButtonAcknowledge() must be called after WasButtonPressed(). Again, make sure this will work considering that the Idle state runs every 1ms.
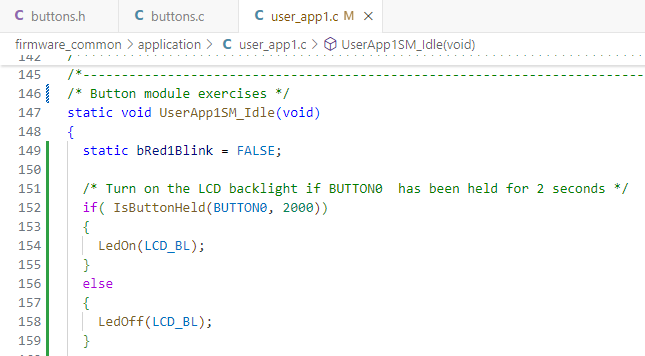
Turn on the LCD backlight if BUTTON0 has been held for 2 seconds. Don’t change the instantaneous function of BUTTON0 when you do this. The backlight should turn off once the button is released.
Now add code to change the RED1 blink rate to a variable value: if the RED1 LED is currently on, then BUTTON0 will select the next fastest blink rate for the RED1 LED. Use LED_1HZ, LED_2HZ, LED_4HZ, and LED_8HZ. Hint: you can NOT simply increment these ENUM values – they need to be specified explicitly. Design this code before you start typing. Make a flow chart if it helps. Try to write the solution before reading below.
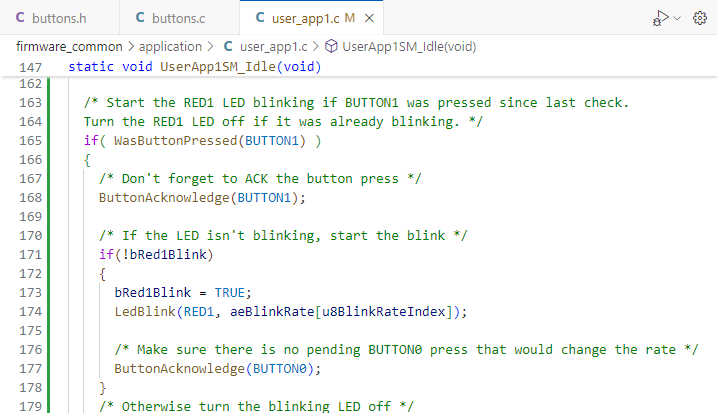
For the variable speed blinking you might use an array to hold the blink rates and then a variable index value that will be adjusted to select different rates. The boolean variable bRed1Blink already tracks if the LED is currently blinking and therefore if the rate can change.
Define variables to use:

Adjust the code to access aeBlinkRate[] for the current blinking rate. What is the purpose of line 177? What happens if that is not included (try it)?
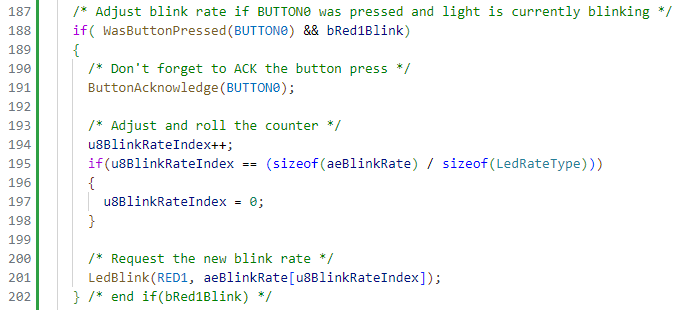
Check if an update to the blinking rate should take place and select the next array value. Why are the “sizeof” operators used here? How do they work? What’s the storage size of an enumerated type on your computer? Does using “sizeof” impact the amount of memory your program uses vs. hard-coding a value here?
Build and test your code to ensure all of the behavior is as expected.
How would you code all of this if the Button API was not available? The API code is obviously very useful and having the buttons available now immediately adds a new dynamic to what you can do with the development board. You should have all that you need to work successfully with the buttons now as long as you remember the basic rules of the API.
Module Exercise
Part 1: Create a simple password system that is entered using BUTTON0 and BUTTON1. The code should start in the “locked state” with LED3 on in yellow color while the user enters the password. Make LED0 turn on blue when BUTTON0 is pressed, and LED1 turn on blue when BUTTON1 is pressed.
The length of the password can be anything between 1 and 10 inputs long. When the user has entered the candidate password, they must press and hold BUTTON0 and BUTTON1 for 2 seconds to check if the password is correct. Blink LED3 red for 3 seconds if the password is wrong then return to yellow. If the password is correct, blink the LED green and then leave it green. Make the default password B0,B1,B1,B0 and demo it when it works. Make sure you design the code so this can be updated fairly easily (though a code compile and download would be required).
Part 2: When the board starts, give the user 3 seconds to press BUTTON1 to enter a setting state where the user can create their own password. The chance to enter the setting state should be indicated by LED3 being white. The normal “locked” state should be entered if BUTTON1 is not pressed. If BUTTON1 is pressed, start blinking LED3 white while the user enters the new password. Pressing and holding BUTTON0 and BUTTON0 completes entry. When a new password has been entered, go to the locked state.
Password setting should only be offered when the board starts. If the user does not enter a password, use the default password. Decide and document what happens if the user tries to enter more than 10 buttons when setting their password. Give your “user guide” document with your system to someone to test to see if it makes sense to them and confirm they can set and use the new password. Note that if you reset the board, the default password will be restored.
[LAST UPDATE: 2024-OCT-22]